Adding Creative Commons licenses to Kaltura MediaSpace videos

I’ve been working on an internal BCcampus project to set up and configure Kaltura MediaSpace for our internal use. We have a number of use cases, not the least of which are providing a central hosting space for videos created as part of a grant associated with the BC Open Textbook Project. Since these videos will be openly licensed (as is everything we create at BCcampus), I want there to be a visible Creative Commons license with each video to let users know the terms of usage for each video.

Out of the box, MediaSpace has a lot of functionality, but the ability to apply a Creative Commons license to a video is not one of them. So, with a bit of consultation with my colleague (and knower of all Kaltura secrets) Jordi Hernandez at UBC, I was able to add a basic CC license field to the videos we host in Mediaspace.

It is actually a pretty straightforward 2 step process. First, you need to create custom metadata fields in the Kaltura Management Console (KMC), then you have to enable the fields in the Kaltura Mediaspace administration console.

I am using an OnPrem service of Kaltura. The MediaSpace instance I am working on is 5.38.07.

Create Custom Fields in the KMC

After logging into the KMC, I went to Settings > Custom Data. This is where I will set up the custom data scheme and define the CC licenses. Click Add New Schema to create a new Creative Commons Metadata Schema. Give your Schema a name, description and a system name. The system name should be one word and short. We want each video to be able to have their own CC license, so we want this metadata schema to apply to Entries and not Categories.

Once you have the Schema set up, you will want to add the actual licenses as field values. Choose Add field and enter in the different CC licenses that you want to make available to your users. These are the options they will see when they upload a new video, and what people who view the video will see on the screen associated with the video. I chose to make my list a Text Select List so that it would appear as a drop down menu for the person uploading the video.

One nice feature of the custom metadata schemas in Kaltura is that you can enable these items to be searched for in the built in search engine. So, with CC licensed material, someone could come to our video portal site and search for nothing but CC0 videos in our collection. I haven’t explored this fully yet, but it does seem to work at a granular level. Which is both good and bad. Good if you want to search for a specific type of CC licensed content in our collection, like a CC0 or CC-BY video. But not so great if you wanted to search for all CC licensed videos regardless of flavour.

Once that is done, the Schema is setup and we can now slip over to MediaSpace to apply it.

Add the custom fields to the upload form in MediaSpace

I logged into the MediaSpace admin console. The area we want to play in is called Customdata. It may appear with a line through it in your admin console. That just means that the module has not been activated.

Go into the Customdata module and make sure it is enabled. In the profileid field, you should be able to find the custom metadata schema that you just created in the KMC. Choose that. You can also make the field a required field and, if you wish, enable the showInSearchResults field to enable the search index.


That’s it. Save the changes and you now have added a custom CC license field to your videos. When someone uploads a video to MediaSpace, they will have an additional field in a dropdown menu that they can choose a CC license to apply to the video.

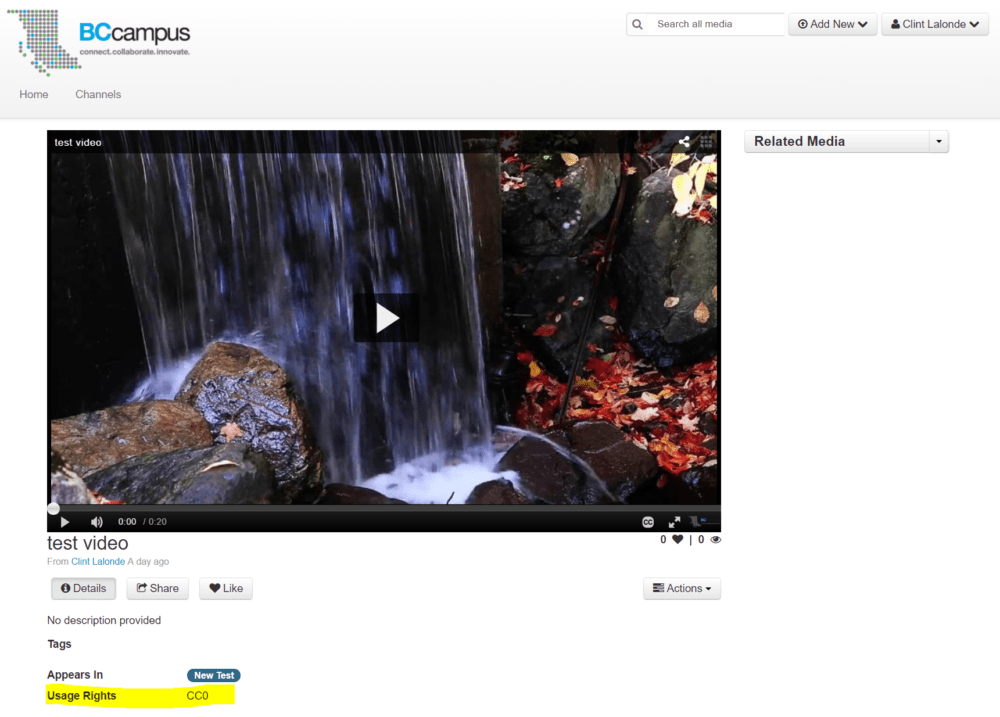
And, when people come to view the video in the MediaSpace site, they will see that the video is licensed with a Creative Commons license.

Now when we upload a video to our MediaSpace site, we can assign it a Creative Commons license that people can see.

Good first step

For me, this is a good first step that gives us the option to apply a visual marker to the video in MediaSpace. However, what would be great (and I am not sure that this can be done) would be to have that CC license metadata embedded in the page in the correct metadata format for CC licenses. This would ensure that it would be found in search engines when people search for CC licensed content.

The second improvement would be to somehow embed that CC license metadata right in the video so that if some were to take a copy of this video, the original license information would go along with the actual video when they downloaded it. Doubt that is possible, but that would be a great feature for organizations like ours that produce a lot of openly licensed content.

Finally, I think that it might be a good idea to add a visual bumper as part of the video that would spell out the CC license. It is what we currently do with our videos, and is good practice to help make it clear that the content is openly licensed.

Photo: CC Stickers by Kristina Alexanderson CC-BY


Setting up Public Channels in Kaltura Mediaspace

Part of my work at BCcampus is to co-administer a provincial shared service of Kaltura with my colleagues at BCNET and UBC. Kaltura is a suite of tools for hosting and streaming media. Mediaspace is the YouTube like front end for Mediaspace. Because of that, BCcampus has access to some of the Kaltura tools for our own business uses and, for the past couple weeks, I have been mucking around with our new Kaltura Mediaspace instance.

In general, I find Kaltura a beast. It is complex, and there are multiple layers of administration to go thru depending on the tools you want to use. It is powerful, no doubt, and has some wonderful features. But likely not a system you want to tackle off the side of your desk to fully grok how it works and, just as important, fully maximize a fairly sizable institutional investment.

At any rate, I have been making some progress on setting up our Mediaspace site. You can take a look. Keep in mind it is being built in real-time and not fully configured and setup. But for now, I have some basic branding in place and a few channels with some content set up.

One task that I was failing at was creating public channels. I was able to make channels and add videos to channels, but could not seem to make those channels publicly visible unless you had an account. Every time someone would click on the Channels link, they would be taken to a log in screen. For an organization that does open work, having closed channels was a no go.

So, after poking around, I went back and did what i should have done in the beginning, which is RTFM. Or, in Kaltura’s case, RTFM’s. Started here, which led me here and here and here and here. Here and here. A bit over here. Some stuff from this 23 page PDF here.

Ok, well, you get the idea and why I say complicated. Oy! And no where could I find the damn setting to make a channel public.

Finally, in a brief 30 second conversation with my colleague Jordi at UBC, I found the setting. In the Mediaspace admin area, there is a setting called supportPublicChannel that needs to be enabled.  That was it. One little setting. Click that and, boom, public channels.


Man, there it was. Right there in the Channels section of the administration console. Hours of pouring thru technical support documents & Google searches on how to enable public channels and the problem was solved in 30 seconds by talking to Jordi.

There were a few steps I did before this that I’ll add in here just in case others are struggling. This info is specific to those in the BC Kaltura Shared Service, which is an on prem instance of Kaltura. If you are not in the shared service, this may not work for you. The other caveat is that I have been working on this off the side of my desk for a couple of weeks now, along with other config issues with Kaltura and Mediaspace and, because I don’t have the awesome discipline of CogDog to document and share on an incremental basis, may be incomplete and missing stuff (and let’s just pause here and acknowledge just how fantastic CogDog is at documenting the technical work he is doing knowing that there are very likely others out there struggling with the same thing).

But, to the best of my memory, here is what I did prior to making that final switch above.

When you log into your KMC and go to Categories, you should see a MediaSpace category already set up as part of the initial system wide configuration. Under channels, I have created 2 channels – EdTech Demos and SCOPE

On the MediaSpace category, the entitlement (what Kaltura calls permissions) are open. These can be overridden at lower categories.


Drilling down to the next layer, Channels, I have set default channels to be Private.


When someone creates a new channel, they may want to work on it before making it open. When you create an actual channel, you will need to override this setting, as this screenshot of the actual SCOPE channel shows. In this case, I have overridden the Channel defaults and made the content privacy no restriction, while adding a restriction on who can actually add content to the category (only the channel administrator).

.

In the Mediaspace admin area, when I create a new channel, I now have an option to make it a Public channel.

So, this was a spot that I was getting confused at because, until I flicked the supportPublicChannel option on, I was not seeing the Public radio button. But I was seeing the Open radio button. So, when I clicked Open, I thought that would make the channel, uh Open. But no. In Kaltura, Public and Open are different concepts and it wasn’t until I enabled the supportPublicChannels switch that the public radio button option became available during my channel setup. Clicking that button made the channel publicly viewable without people having to log in.

Now, when I upload a video, I can publish it to multiple channels, including the open and public ones.


Like I said, this is likely missing out a bunch of other steps I have done along the way to enable public channels on our Mediaspace instance. But for those of you in the KSS struggling with setting up public channels – supportPublicChannel was what finally did it for me. Thanks Jordi!